Monster Cookie Bars: The Ultimate Shortcut to Chewy Perfection
Imagine a dessert that combines the nostalgic charm of classic monster cookies with the irresistible convenience of a bar. That's precisely what you get with monster cookie bars – a vibrant medley of peanut butter, oats, chocolate chips, and colorful M&Ms, all baked into one gloriously chewy slab. But beyond their undeniable deliciousness, these bars hold a secret weapon: they are significantly easier to make than their drop-cookie counterparts, promising a massively tasty treat with minimal fuss. If you're searching for a dessert that delivers on both flavor and convenience, these thick and chewy bars are about to become your new obsession.
From their quick prep time to their crowd-pleasing appeal, monster cookie bars are a true baking marvel. They bypass the tedious individual scooping and shaping, allowing you to whip up a batch of these irresistible treats in minutes. So, let's dive into why these monster creations are not just a delight for your taste buds, but also a dream for any baker looking for an easier, quicker, and undeniably chewier alternative.
Embrace the Simplicity: Why Monster Cookie Bars Are Your New Baking Best Friend
The biggest selling point of monster cookie bars, beyond their phenomenal flavor, is their incredible ease. Traditional drop cookies, while beloved, demand a certain level of precision and patience. You have to scoop each cookie, space them on a baking sheet, and often bake in multiple batches. This process can be time-consuming and sometimes lead to uneven results.
Enter the monster cookie bar. Here’s why they simplify your baking life:
- No Scooping, No Rolling: Forget about meticulously portioning out individual cookies. With bars, you simply press the entire dough mixture into a prepared pan, spread it evenly, and you’re done. This single step saves a significant amount of time and effort.
- One-Pan Wonder: All the dough goes into one pan, meaning just one batch to bake. This dramatically reduces total oven time and the amount of clean-up required afterward.
- Consistent Results: Because the dough is baked as a single unit, you often achieve more consistent doneness and chewiness throughout the batch. No more over-baked edges and under-baked centers!
- Quick to Mix Up: These bars are incredibly fast to assemble. The wet ingredients (melted butter, brown sugar, peanut butter, corn syrup, vanilla, salt, almond extract, cinnamon, nutmeg, eggs) are whisked together, then the dry ingredients (flour, baking soda) are folded in, followed by the oats and candy mix-ins. The dough is thick but manageable, ready for the oven in what feels like mere minutes. This makes them a fantastic last-minute dessert option for parties, potlucks, or unexpected guests.
The transformation from individual cookies to a convenient bar format doesn't just save time; it streamlines the entire baking experience, making it less stressful and more enjoyable. It’s no wonder they are always a crowd-pleaser!
The Science of Supreme Chewiness: Unlocking the Monster Cookie Bar Magic
What makes a monster cookie bar so incredibly chewy? It's a delightful interplay of key ingredients and precise techniques that contribute to that sought-after gooey, tender texture. If you’re a fan of a perfectly soft and yielding treat, these bars truly nail it.
Here are the secrets behind their irresistible chewiness:
- Creamy Peanut Butter: This is truly the "secret sauce" for chewiness. Peanut butter adds a significant amount of fat and moisture, which keeps the bars soft and moist, preventing them from drying out. Its unique emulsified texture also contributes to the dense, chewy bite that monster cookie bars are famous for. It mixes beautifully with vanilla, butter, and chocolate, creating a symphony of flavors.
- Brown Sugar Domination: Unlike granulated sugar, which contributes to crispiness, brown sugar contains molasses, which is naturally hygroscopic (it attracts and retains moisture). Using a higher ratio of brown sugar to white sugar (or exclusively brown sugar, as in many recipes) is key to a chewier texture. It keeps the bars moist and flexible, even after cooling.
- Melted Butter: Starting with melted butter rather than creamed butter significantly impacts texture. Melted butter disperses more evenly and coats the flour more thoroughly, inhibiting gluten development and resulting in a denser, chewier crumb rather than a light, airy one.
- The Power of Extra Egg Yolk: Many chewy bar recipes call for an extra egg yolk, and for good reason. Egg yolks are rich in fat and lecithin, an emulsifier. This adds richness, moisture, and binding power, which all contribute to a fudgier, chewier texture. The extra yolk works alongside the whole egg to create a wonderfully tender and moist interior.
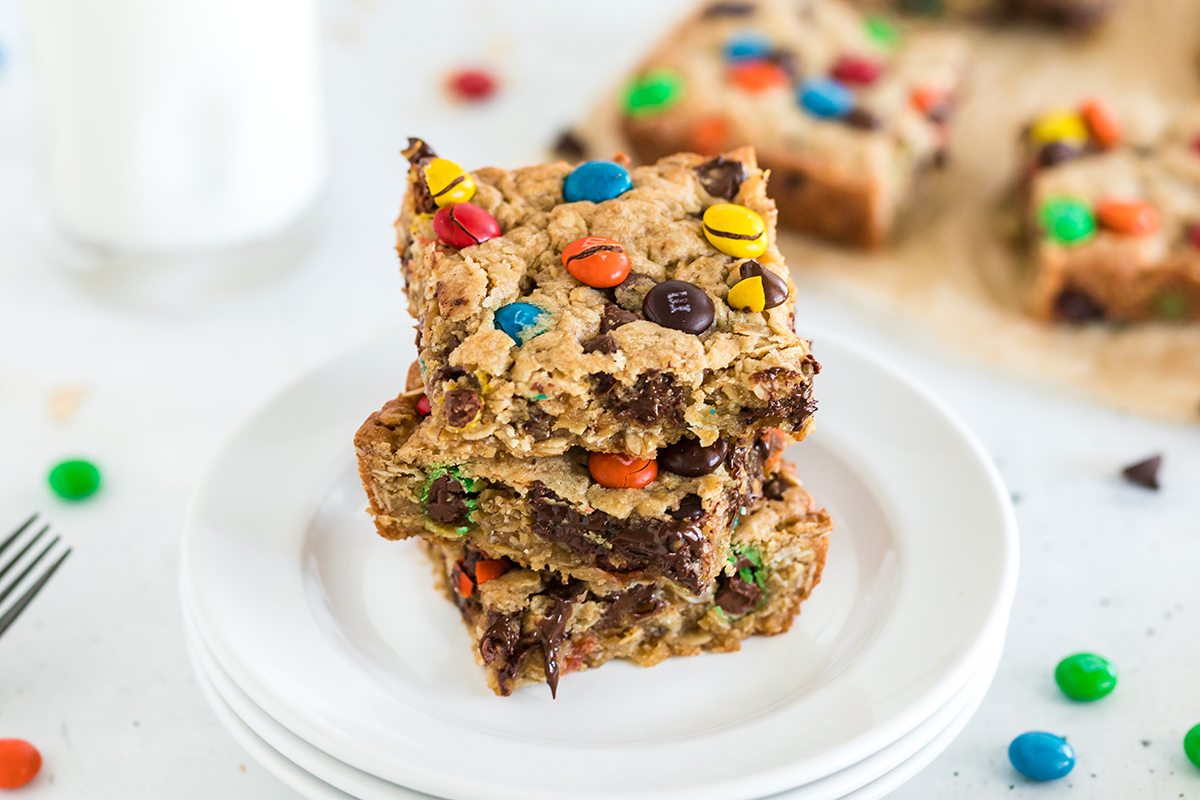
- Old-Fashioned Oats: While quick oats can be used, old-fashioned (rolled) oats are highly recommended for their "larger, heartier texture." They absorb moisture and soften during baking, but retain enough structure to provide a satisfying, substantial chew that defines a true peanut butter oatmeal cookie bar. They don't just add texture; they are integral to the chewiness.
- Proper Baking & Cooling: Baking until the center just looks set and the edges are golden brown (typically 30-35 minutes for an 8x8 pan) is crucial. Overbaking can lead to dry, crumbly bars. Equally important is allowing the bars to cool completely in the pan. As they cool, the internal structure sets, and the moisture redistributes, locking in that fantastic chewiness. Resist the urge to cut them warm – patience is rewarded with perfect texture!
By understanding these components, you can appreciate the thoughtful design behind every incredibly chewy bite of a monster cookie bar.
Beyond the Basics: Customizing Your Monster Cookie Bars for Ultimate Enjoyment
One of the most enjoyable aspects of baking monster cookie bars is the freedom to customize them. While the classic combination of peanut butter, oats, chocolate chips, and M&Ms is a winner, you can easily personalize this recipe to suit your taste preferences or whatever you have in your pantry. It’s like a candy store exploded in your kitchen, and you are the master of ceremonies!
Here are some creative ways to make your monster cookie bars uniquely yours:
- Vary Your Chocolate:
- Different Chip Types: Swap out half of the semi-sweet chocolate chips for white chocolate chips, dark chocolate chunks, milk chocolate chips, or even butterscotch chips for different flavor profiles.
- Chopped Candy Bars: Fold in chopped Snickers, Reese's peanut butter cups, or other favorite candy bars for an extra layer of indulgence.
- Explore New Mix-ins:
- Nuts: Add chopped walnuts, pecans, or even roasted peanuts for extra crunch and nutty flavor.
- Dried Fruits: Craisins, raisins, or chopped dried apricots can add a sweet and slightly tangy chew.
- Salty Twists: Crushed pretzels or a sprinkle of flaky sea salt on top can beautifully contrast the sweetness.
- Other Candies: Besides M&Ms, consider adding Reese's Pieces, chopped toffee bits, or even mini marshmallows.
- Flavor Enhancements:
- Extracts: While vanilla and almond extract are staples, a tiny bit of coffee extract can deepen the chocolate flavor, or orange zest could add a bright note.
- Spices: A pinch more cinnamon or a touch of ginger could add warmth, especially if you're making these for the holidays.
- Seasonal Themes:
- Halloween: Use orange, black, and purple M&Ms, and maybe some candy corn.
- Christmas: Opt for red and green M&Ms, and perhaps some crushed candy canes.
- Spring/Easter: Pastel-colored M&Ms or mini chocolate eggs work wonderfully.
The beauty of these bars lies in their adaptability. Don't be afraid to experiment and create your signature version. To dive deeper into making your monster cookie bars truly unique, check out our guide on Unlock Irresistible Chewiness: Customizing Your Monster Cookie Bars.
Mastering the Bake: A Seamless Recipe Guide for Perfect Monster Cookie Bars
The entire process of making monster cookie bars is designed for efficiency and delicious results. With just about an hour and ten minutes from start to finish (including cooling time), you can have 16 generous servings of these massively tasty treats ready to enjoy. Let's walk through the streamlined steps:
- Preparation is Key (10 mins prep):
- Preheat Oven: Set your oven to 350 degrees F (180 degrees C). This ensures the oven is at the correct temperature for even baking from the moment your bars go in.
- Pan Lining: Line an 8x8-inch square pan with parchment paper. This is a crucial step for easy removal. Make sure the parchment paper overhangs on all sides; these "handles" will allow you to lift the cooled bars right out of the pan for clean cutting.
- Mixing Magic:
- Wet Ingredients First: In a large bowl, combine the melted unsalted butter, firmly packed brown sugar, creamy peanut butter, optional dark corn syrup (which aids in chewiness and prevents crystallization), vanilla extract, salt, almond extract, cinnamon, and nutmeg. Whisk until the mixture is smooth and thoroughly combined.
- Egg Incorporation: Add the large egg and the extra large egg yolk. Whisk again until they are fully incorporated, contributing to the richness and chewiness of the dough.
- Dry Ingredients: Gently whisk in the all-purpose flour and baking soda until just combined. Overmixing flour can develop gluten too much, leading to tougher bars, so mix just enough.
- Fold in the Goodies: Finally, fold in the rolled oats, chocolate chips, and candy-coated chocolate pieces (like M&Ms). The dough will be noticeably thick – this is perfectly normal and contributes to the bars' substantial texture.
- Baking to Perfection (30-35 mins cook time):
- Spread Evenly: Pour the thick dough into your prepared pan and use a spatula or the back of a spoon to spread it into an even layer, ensuring consistent thickness throughout.
- Bake Until Set: Place the pan in the preheated oven. Bake for 30 to 35 minutes, or until the center of the bars appears set (no longer jiggly) and the edges are beautifully golden brown. Keep an eye on them to prevent overbaking.
- The Critical Cool Down (30 mins cool time):
- Patience is a Virtue: This step is non-negotiable for achieving that perfect chewy texture and clean cuts. Allow the bars to cool completely in the pan before attempting to remove and cut them. Cooling allows the fats and sugars to re-solidify, setting the structure and ensuring they hold together.
- Cut and Serve: Once fully cooled, use the parchment paper overhang to lift the entire slab out of the pan. Place it on a cutting board and slice into 16 bars.
For a detailed, step-by-step recipe that ensures every batch of monster cookie bars is a triumph, be sure to check out our Easy Monster Cookie Bars: Your Go-To Chewy Peanut Butter & M&M Recipe.
Conclusion: Your New Favorite Chewy Treat Awaits!
From their remarkably simple preparation to their utterly irresistible chewy texture, monster cookie bars stand out as a truly superior dessert. They masterfully combine the vibrant flavors of peanut butter, oats, chocolate, and colorful candies into a single, cohesive, and incredibly satisfying treat. Whether you're a seasoned baker or just starting out, the ease of simply pressing the dough into a pan, rather than scooping individual cookies, makes them a game-changer for quick, delicious results. With their rich chewiness and endless customization possibilities, these bars are more than just a dessert; they're a celebration of flavor and convenience. So, the next time you're craving a sweet escape, unleash your inner cookie monster and whip up a batch of these glorious bars – you won't regret saving a square (or two!) for yourself before they vanish in a delicious frenzy!
